Centering elements on a canvas in WPF
While I was fiddling around with WPF in general I noticed that when I dropped inane little circles and boxes onto a canvas I'd never be able to center it inside the containing canvas just right. If you try the following XAML in the excellent Kaxaml tool for instance:
<Window xmlns="http://schemas.microsoft.com/winfx/2006/xaml/presentation"
        xmlns:x="http://schemas.microsoft.com/winfx/2006/xaml"
        Width="300"
        Height="300"
        Title="Centered?">
  <Grid>
    <Canvas Background="Black" Width="300" Height="300">
      <Ellipse Width="50"
               Height="50"
               Canvas.Left="125"
               Canvas.Top="125"
               Fill="LightGray"
               x:Name="ellipse" />
    </Canvas>
  </Grid>
</Window>
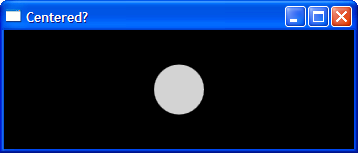
Here's what you see:

Clearly the ellipse is not positioned in the center of the containing canvas even though the point (125,125) should in fact have done so. If however you set the value None for the WindowStyle attribute of the Window tag like so (note the code in bold):
<Window xmlns="http://schemas.microsoft.com/winfx/2006/xaml/presentation"
        xmlns:x="http://schemas.microsoft.com/winfx/2006/xaml"
        Width="300"
        Height="300"
        Title="Centered?"
        WindowStyle="None">
  <Grid>
    <Canvas Background="Black" Width="300" Height="300">
      <Ellipse Width="50"
               Height="50"
               Canvas.Left="125"
               Canvas.Top="125"
               Fill="LightGray"
               x:Name="ellipse" />
    </Canvas>
  </Grid>
</Window>
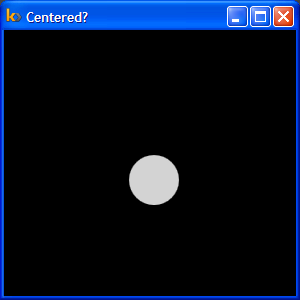
Then here's what you get (you'll have to hit Alt+F4 to close this window):

As you can probably tell, the circle seems nicely centered now. The problem therefore is the title bar. In the first XAML code snippet above I had given a dimension of 300x300 for the canvas. Accounting for the height of the title bar, this causes the canvas to actually extend beyond the window border which of course, gets clipped by the OS. In order to trim the canvas to size I decided to put it inside a dock panel and remove the explicit width/height specification. Here's what I came up with:
<Window xmlns="http://schemas.microsoft.com/winfx/2006/xaml/presentation"
        xmlns:x="http://schemas.microsoft.com/winfx/2006/xaml"
        Width="300"
        Height="300"
        Title="Centered?">
  <DockPanel>
    <Canvas Background="Black">
      <Ellipse Width="50"
               Height="50"
               Canvas.Left="125"
               Canvas.Top="125"
               Fill="LightGray"
               x:Name="ellipse" />
    </Canvas>
  </DockPanel>
</Window>
This produced a window that looked like this:
Again, not quite in the center of the client area. The issue here is of course that now, the canvas size is not 300x300 which means the point (125,125) should not be the top left co-ordinate of the ellipse if we want it centered. Here's a little XAML that shows you the real dimensions of the canvas.
<Window xmlns="http://schemas.microsoft.com/winfx/2006/xaml/presentation"
        xmlns:x="http://schemas.microsoft.com/winfx/2006/xaml"
        Width="300"
        Height="300"
        Title="Centered?">
  <DockPanel>
    <Canvas Background="Black" x:Name="canvas">
      <Ellipse Width="50"
               Height="50"
               Canvas.Left="125"
               Canvas.Top="125"
               Fill="LightGray"
               x:Name="ellipse" />
      <TextBlock Text="{Binding ElementName=canvas, Path=ActualWidth}"
                 Canvas.Left="10"
                 Canvas.Top="10"
                 Foreground="White"/>
      <TextBlock Text=", "
                 Canvas.Left="30"
                 Canvas.Top="10"
                 Foreground="White"/>
      <TextBlock Text="{Binding ElementName=canvas, Path=ActualHeight}"
                 Canvas.Left="38"
                 Canvas.Top="10"
                 Foreground="White"/>
    </Canvas>
  </DockPanel>
</Window>
Here's what the window that this produces looks like:
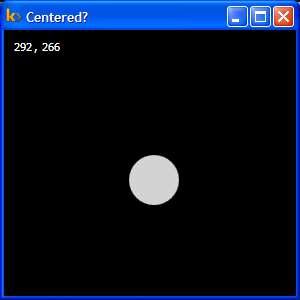
The correct top-left co-ordinate to center the ellipse therefore is (121,108). The straightforwad solution seems to be to just handle it in code and be done with it. For example, the following code in the window class's constructor manages to do the job:
this.Loaded += (sender, e) =>
{
    Canvas.SetLeft(ellipse, (canvas.ActualWidth - ellipse.ActualWidth) / 2);
    Canvas.SetTop(ellipse, (canvas.ActualHeight - ellipse.ActualHeight) / 2);
};
But this isn't quite the WPF way of doing things and besides if you resized the window the ellipse would again be off center and you'd need to write more code to handle the window resize events and re-layout the ellipse in response. Ideally, these sort of things should be handled using the WPF binding system. At first I figured this should be really easy to do with XAML like this:
<Window xmlns="http://schemas.microsoft.com/winfx/2006/xaml/presentation"
        xmlns:x="http://schemas.microsoft.com/winfx/2006/xaml"
        Width="300"
        Height="300"
        Title="Centered?">
  <DockPanel>
    <Canvas Background="Black" x:Name="canvas">
      <Ellipse Width="50"
               Height="50"
               Canvas.Left="{Binding ElementName=canvas, Path=((ActualWidth - 50)/2)}"
               Canvas.Top="{Binding ElementName=canvas, Path=((ActualHeight - 50)/2)}"
               Fill="LightGray"
               x:Name="ellipse" />
    </Canvas>
  </DockPanel>
</Window>
Here's what this produced:
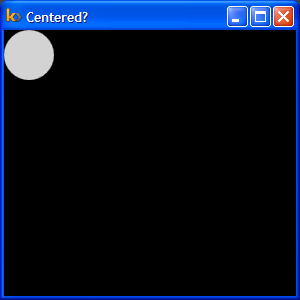
As it turns out one cannot use expressions for the value of the Path attribute of the Binding markup extension! Some folks over at blendables.com have however solved this problem by developing a custom WPF markup extension that allows the specification of expressions. You can get it here. But this seemed a bit extreme given the circumstances. The alternative as it happens is to use multi-binding with a custom value converter. First we write a class that implements IMultiValueConverter like so:
public class HalfValueConverter : IMultiValueConverter
{
    #region IMultiValueConverter Members

    public object Convert(object[] values,
                          Type targetType,
                          object parameter,
                          CultureInfo culture)
    {
        if (values == null || values.Length < 2)
        {
            throw new ArgumentException(
                "HalfValueConverter expects 2 double values to be passed" +
                " in this order -> totalWidth, width",
                "values");
        }

        double totalWidth = (double)values[0];
        double width = (double)values[1];
        return (object)((totalWidth - width) / 2);
    }

    public object[] ConvertBack(object value,
                                Type[] targetTypes,
                                object parameter,
                                CultureInfo culture)
    {
        throw new NotImplementedException();
    }

    #endregion
}
And then we use the following XAML (you cannot do this in Kaxaml because it does not support writing code-behind) to get the job done!
<Window x:Class="CenterWin.Window1"
        xmlns="http://schemas.microsoft.com/winfx/2006/xaml/presentation"
        xmlns:x="http://schemas.microsoft.com/winfx/2006/xaml"
        Title="Centered?"
        Height="300"
        Width="300"
        Background="Black"
        xmlns:local="clr-namespace:CenterWin">
    <DockPanel>
        <DockPanel.Resources>
            <local:HalfValueConverter x:Key="HalfValue" />
        </DockPanel.Resources>
        <Canvas x:Name="canvas">
            <Ellipse Width="50"
                     Height="50"
                     Fill="LightGray"
                     x:Name="ellipse">
                <Canvas.Left>
                    <MultiBinding Converter="{StaticResource HalfValue}">
                        <Binding ElementName="canvas" Path="ActualWidth" />
                        <Binding ElementName="ellipse" Path="ActualWidth" />
                    </MultiBinding>
                </Canvas.Left>
                <Canvas.Top>
                    <MultiBinding Converter="{StaticResource HalfValue}">
                        <Binding ElementName="canvas" Path="ActualHeight" />
                        <Binding ElementName="ellipse" Path="ActualHeight" />
                    </MultiBinding>
                </Canvas.Top>
            </Ellipse>
        </Canvas>
    </DockPanel>
</Window>
That's it! Now you can resize to your heart's content and the WPF binding system will take care of all the updates. Here's a screenshot of the window after resizing it a bit.